1. Go To Tweetdeck Settings > Accounts > Add New Account > Add Your Facebook account.
You will prompt to add your Facebook Pages as well. Isn’t that convenient?
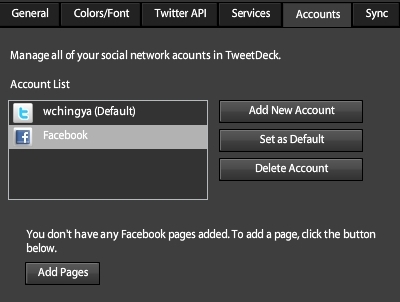

3. Tweetdeck will display all Facebook Pages that you are administrated.

Pick either or all for your preferences; publish posts or comments without repeated logins:

4. Now your can update your Facebook account or Page(s) via Tweetdeck.

Seesmic Desktop (v0.6.2)
1. Go to Control Panel > Accounts > Click the ‘+’ sign & Add your Facebook account.
2. Click at the newly added Facebook account, you’re optional to have either or both included for:
a. Administered pages – Facebook Pages you’re an admin of.
b. Fan Pages – Pages you followed.

3. Make your selections after you’ve authorized and integrated Facebook Pages with your Seesmic Desktop.

4. Configure the Extended Permissions to have posts/comments published via Seesmic Desktop without repeated prompting.

5. There! Add as many Facebook Pages you like and start your selective tweeting.

During the configuration, you can have either Your Profile or Your Fan Page(s) to integrate with Twitter account. We’ll look at the Fan Page configuration first:
1. Go to ‘Your Fan Pages‘. Only pages you’re an admin of will be displayed. Make your pick.
2. Type in your Twitter username > Save Changes.

3. In order to have BOTH Fan Page and personal account compatible with the plugin, you need to grant permission for Fan Page first before doing the same for profile.

4. After ‘Grant Permission‘, you’ll be directed to allow status updates as illustrated.
Choose your Fan Page first and click ‘Allow Status Updates‘ before you do the same for your profile page.

But make sure you have filled in your Twitter name first before authorization.

5. This is how the updates will appear in Fan Pages:

 Popular
 Tags
Tags Videos


.png)

Share
& Comment
Tweet